The Arrival
It’s with my tail between my legs that I admit I had never been to Jackson Hole before. But as the old mantra goes, “better late than never,” so last week, I packed my bags, hopped on a plane and disembarked humbly beneath the towering peaks of Grand Teton National Park.
My first reaction to this incredible part of the world was of sheer awe. On one side of the runway, you have the Tetons, some of the most striking mountains in the world. On the other side, you have a vast meadow, bordered by the mellower but still notable Gros Ventre range. And then there’s the airport: it’s about the size of the Freeskier office.
My tour guide for this mini trip was Freeskier/Snowboard account rep Jason Smith. He moved to Jackson four years ago and hasn’t looked back. He’s now dabbling in the extreme world of shred mountaineering, and it’s safe to say he can out-hike 99% of the people reading this article. I was having my doubts about my little legs keeping up, but that story can wait for later…
Our first stop from the airport was to the town of Jackson. The resort itself (Jackson Hole Mountain Resort (JHMR)) is actually based in Teton Village, but before we could get rad, we had to get rowdy. We ponied up for a great meal at Snake River Brewery, a joint that serves up some solid pre-shred grub and beer. From there, we met up with some friends and I turned it up to 11 (don’t do that your night before your first day at Jackson). We hit up the Cowboy Bar (where the bar stools are horse saddles), then the Caddy (diner, two-for-one drinks? sweet) and then the Tavern. Before we knew it, it was lights out, time to go home, and I passed out. Pretty good little evening, but that’s not why I came to Jackson, so enough of that"¦ to the rad!
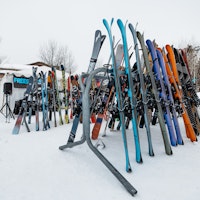
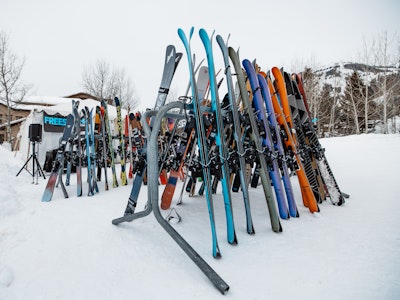
My Gear
Safety
Most of the terrain described in this article is uncontrolled backcountry. That means: your safety is in your own hands. There are hundreds of resources around the web with more details, but here are some basics:
Day 1: Cody Peak (Pucker Face) & Four Pines
Day 1 is the red line. Note that the line should actually keep going fall-line, not back up that treed ridge.
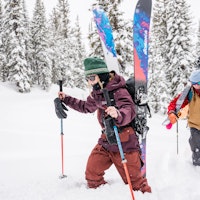
With a pounding head, dry eyes and my tail back between my legs, Jason woke me up at 8:00 to go shred. If you have as little time to spend at Jackson as I did, you don’t want to waste a second. So we immediately boarded the Tram, which brought us up 4,139 feet, and shat us out on top of the world. Staring us blankly in the face was Cody Peak, the famous summit just south of the boundary gates that you’ve undoubtedly seen countless times in movies and photos. I looked up in awe, thinking how fun it would be to shred it.
“Put your skis on your back, that’s where we’re going,” said Jason with a sly grin that implied, Time to GET RAD.
First hike up Cody
So up we went to the top of Pucker, a line that this year (due to low snow) empties into a small funnel with a tiny mandatory into an open apron. The drop-in isn’t too gnarly, but if you biff it, you’re going for a hell of a ride. Standing atop the entrance is definitely a good way to slay a hangover, and when you get to the bottom and look up, everything just seems to feel right. It’s one of the cooler looking lines that you can access quickly, and the perfect way to kickstart a Jackson mission.
Pucker Face from the bottom
From the bottom of Pucker, you’re looking at a 10-minute sidestep (under Fat Bastard, which you may remember from the November, 2008 cover of Freeskier), into a 20-minute, mellow hike to the top of Four Pines; our next stop in the journey.
Unlike the exposed, above-tree line skiing of Cody, Four Pines is mid-elevation and more treed with a ton of cool features. The snow was much deeper and softer than atop Cody. We hit some quick north facing chutes on Four Pines. It was barely tracked, with numerous small cliff zones to punch off, into lots of narrow shoots and crannies. The out from Four Pines is an easy, somewhat shrubby (low snow year, later season) traverse back to the base of the resort. Pretty modest effort for a sick 2,000-foot, fall line backcountry run.
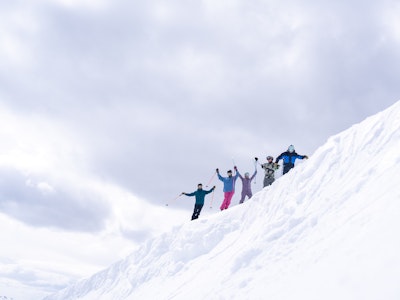
We spent the rest of the day shredding in-bounds with local Jackson crusher Andrew Whiteford. The conditions were burly, with no real snowfall in many days and big temp swings freezing/warming/freezing/warming the snow. But we took a couple laps up Sublette Chair (where on a pow day, you’d never have to leave the gates; there’s epic terrain along the whole ridge under the lift) and smashed up the Expert Chutes down through Paint Brush and onto Toilet Bowl. It was just what my legs needed to get entirely fried, and although we really only did four laps, day one was a pretty solid tour of the mountain.
The apres scene at Jackson is pretty obvious: head to the bottom of the tram, look for all the people hanging out in shades and drinking beer, and you’re there. Most of the action happens in and around Nick Wilson’s: small part cafeteria, big part bar that serves more PBR than anywhere else in the land. It’s mellow scene, with zero attitude (at least during my time there). Most of the discussion centers around who had skied/snowboarded what terrain and how gnarly/sweet it was. Props were going around, high fives were had here and there, and there were more dogs jamming than in the streets of Athens.
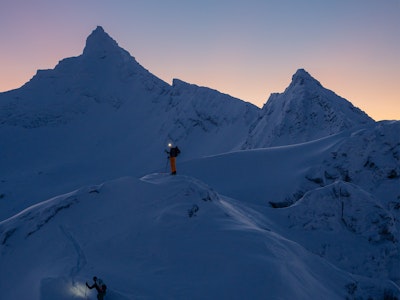
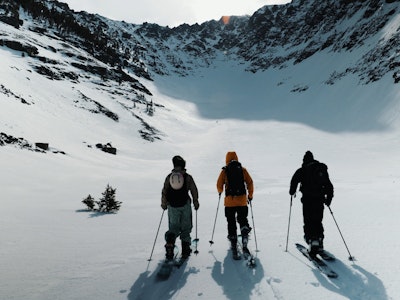
Day 2: Cody Peak (Four Shadows) & No Name
Looking down Four Shadows
The sun was still shining bright (not sure if it ever went down) when we awoke at 8 a.m. on day 2. Again, we boarded the Tram, which took us to 10,450 feet, strapped the skis to the pack and got hiking up Cody. We met up with local shredder Don Watkins who, like Whiteford, is one of those guys you just want to shred with. His experience, demeanor and hard-charging antics make for a hell of a good time.
A look at Four Shadows
We continued past Pucker (although I secretly wanted a rebate, having taken it too slow for my liking on Day 1) and on to Four Shadows. Four Shadows is one of the more picturesque runs I’ve had, this side of Alaska. Big spires line the right side of the couloir, while the valley floor extends out the peripheral. The snow was “just north of heinous "“ firm chalk,” as Jason Smith lovingly put it, but if you get it when the getting’s good, it’s an all-timer, considering the easy access and steepness of the terrain. Hell of a rush.
Final bit of hiking and our line down No Name
From the run out of Four Shadows, you’re in a perfect spot to get to No Name, hands down the sickest run of the trip. Hike straight up Powder 8 (which, if you want mellow, open-field pow skiing, you can just bansch back down and lap all day), then shimmy across a sketchy traverse line underneath the legendary and hairball-in-these-conditions Once is Enough couloir (another "˜must"™ for the next Jackson trip). The traverse can get dangerous on hot days, as massive cornices and rotten rock line the ridge high above your dome. This is definitely an area you don’t want to lolly gag on, or stand there whacking your pud. After the traverse, you’re another 5-10-minute boot pack from the top of No Name Face, another signature JH classic that demands to be shredded.
No Name from the bottom. Note the little skier above the last little chute
We sent it right down the gut of No Name, with only two tracks blemishing the face before our arrival. Stability was good, the snow was shin-deep, and we top-to-bottomed with ease. With better snow than we found on Cody, No Name was ripe for charging. If you are in the mood to air it out, you’ll want to scope the beautiful 15- to 30-foot cliffs that line the skiers left side of the face.
After a quick, sun-baked ski out through Pinedale, we boarded the gondola for a meal at the Casper restaurant. We then scoped out another of Jackson’s legendary spring skiing terrain features: The Worker Wiggle.
The Worker Wiggle on Rendezvous
This naturally man-made slalom becomes a ditch ranging from 1- to 4-feet deep through the gut of Rendezvous Bowl. It’s manicured throughout the season by skiers who use the middle-markers of the bowl as race gates. By the time we shredded it last week, it was a mix of gnarly bank turns, grass, rocks and little kids eating shit around every second corner. No trip to the Hole is complete without at least one jaunt down the Wiggle. From that stunt ditch, we headed to the halfpipe, which, although no Breck pipe, is pretty well cut, and a perfect way to end a day on fat skis while rocking a backpack. Again, look out for the little kids eating it.
We ended the evening with a banger of a meal at The Osteria, courtesy of Jackson Hole Communication Manager, Zahan Billimoria. Speaking of Z, do whatever you can to track this guy down while you’re in Jackson. He’s an Exum guide and mountaineer; the real deal. He’s a wealth of knowledge waiting to be tapped, so get tapping.
In two days at Jackson, we skied some classics – Pucker, Four Shadows, No Name and Four Pines; dipped into the apres scene and downed some great eats; we even got a couple runs through a halfpipe. But no trip to Jackson Hole, Wyoming is complete with a tour in Grand Teton National Park. So that’s what we did on day three [that story coming soon].
Resources
Here are some sites to check out before heading on your Jackson Hole vaca:
Jackson Hole dot comJackson’s Facebook Fan PageTrail MapOfficial First Timers GuideTeton AT – A guide to ski mountaineering in the TetonsGetUngrounded.com – Locals blog about getting rad on a daily basis
Final Tease
Here’s the video from the US National Ski Mountaineering Championships held a couple days after I left Jackson. Zahan (mentioned above) placed 7th. Pretty solid!
![[GIVEAWAY] Win a Legendary Ski Trip with Icelantic's Road to the Rocks](https://www.datocms-assets.com/163516/1765233064-r2r26_freeskier_leaderboard1.jpg?w=200&h=200&fit=crop)
![[GIVEAWAY] Win a Head-to-Toe Ski Setup from IFSA](https://www.datocms-assets.com/163516/1765920344-ifsa.jpg?w=200&h=200&fit=crop)
![[GIVEAWAY] Win a Legendary Ski Trip with Icelantic's Road to the Rocks](https://www.datocms-assets.com/163516/1765233064-r2r26_freeskier_leaderboard1.jpg?auto=format&w=400&h=300&fit=crop&crop=faces,entropy)
![[GIVEAWAY] Win a Head-to-Toe Ski Setup from IFSA](https://www.datocms-assets.com/163516/1765920344-ifsa.jpg?auto=format&w=400&h=300&fit=crop&crop=faces,entropy)